Having shaky hands kept me from painting my nails well into my twenties. Easy DIY nail art can be challenging even for those with the most-steady of hands, but even when I paint my nails solid colors they still would end up all over my hands. Sadly, when it comes to nail art and shaky hands, practice doesn’t make perfect. When my bestie and I found ourselves unemployed, sick, and temporarily under our parents' roofs, we had to get creative with our pastimes. Nail painting became a hobby for us and eventually, our creations became the envy of all our employed friends. The secret was precision Q-tips and designs that even the shakiest of hands could master.
Whenever someone admires my nails and my steady hand, I launch into an unconvincing argument of how anyone can do these designs. If I can do it with my shaky hands, then there is no reason why anyone else can’t execute some seriously chic nail art. DIY nail art has never been easier with scotch tape, quick strokes, and confidence. Salon nail art often looks perfect, but sometimes that slightly crooked line really starts to nag at you especially after you’ve paid for your new mani. The beauty of doing DIY nails is that you can spend as much or little time on perfecting your designs as you want – free of charge.
Start each nail design with a sturdy base coat and finish with a fast drying top coat.
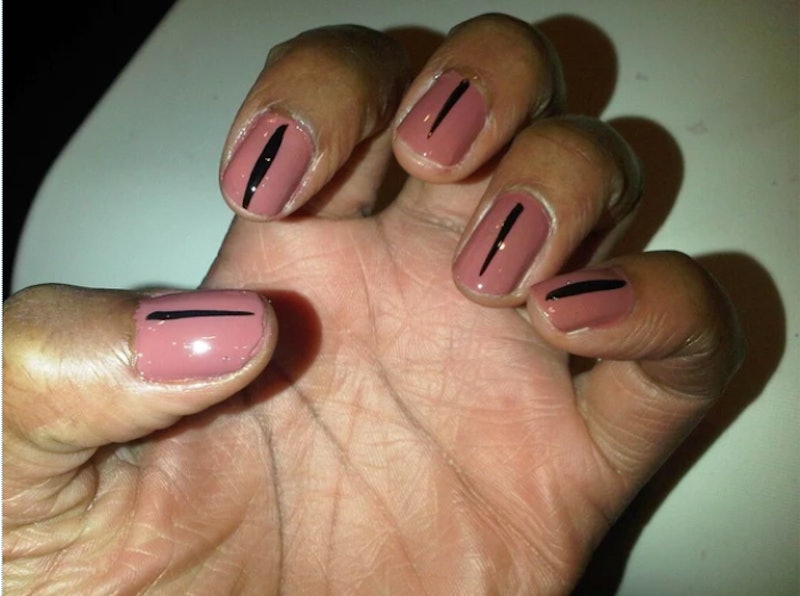
1. Black Eyed Pea Nails
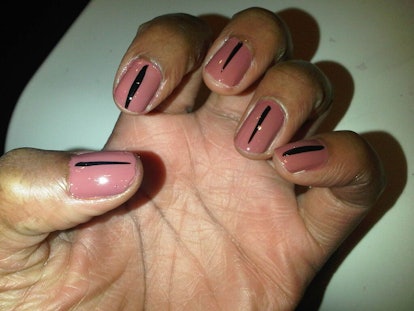
This is one of my fave nail designs and the key to keeping the lines straight is all in the speed of your strokes. Start with a dark nail polish for the first coat (I chose navy blue), and then use a contrasting lighter shade. Wait until the first coat of polish has dried slightly, without the help of a top coat, and quickly draw a straight line in the center of your nail, away from the cuticle.
For a more narrow affect, use a nail polish specific for nail art (they have thinner brushes). I actually repurposed a brush from an old nail polish by rinsing it in nail polish remover before I did my lines. After your top polish has begun to dry, apply your top coat. Avoid going over the nails with you top coat, this can make the colors bleed into each other.
2. Dripping Party Nails
These nails are best done on separate days, unless you have an endless amount of hours to paint your nails. You want each new polish to completely dry before applying a new coat of polish. First, paint your nails a light shade. Next, apply a top coat to your base polish and wait for it to completely dry. Those nails should be so dry that you can untie a knot confidently without smudging it. Once you're all dry, apply tape on your painted nails. I like for the tape to cover 25 percent of my nail to give me space for more art.
Now, use a darker (or brighter) shade of polish to paint over the tape and painted nail. After you’ve completed a hand, slowly remove the scotch tape from your nails and repeat on the other hand. Now, choose a contrasting shade to make dripping nail art on the secondary polish. I try not to worry about being perfect, because you can make the drips longer after the fact. Finally, apply a top coat on your party nails.
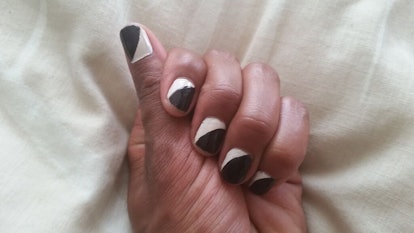
3. Diagonal Nail Time

Put your freehand skills to work by adding an extra layer of contrasting polish. After your first color has dried, apply a second color of nail polish starting at the bottom left corner of your nail swooping upwards to the right hand side. If you’re impressed with your skills, try applying a thinner line of polish where the two colors meet in the same pattern. It’s tri-color perfection.
4. Nail Moons
After spotting a nail art lover on the train with these incredible nails, I had to try it myself. I applied white nail polish on as my bottom coat and then free handed the black to make a white moon in the corner of my nails. Again, the speed of your freehand design will definitely help you from smudging the black against the white.
My nails weren’t exactly perfect when I was finished, but a little nail polish remover to remove on a precision Q-tip helped me fix the imperfections. After you fix any polish blunders on the nail, apply your top coat.
5. Geometric Nails

Now that you’ve regained your confidence with free hand nail art, you can live in a world where diamond nails are easy and beautiful on the reg. Choose three contrasting colors, go sparkly, go crackle, and basically just do you via your nails. After your bottom color of choice has dried and you’ve applied a top coat, use tape in the center of your nail to cover the bottom half of your nail bed.
Enter your secondary color: Paint the top of your nail and allow to dry sans top coat. Finally, you’ll make a swooping motion with your third nail color from the bottom left hand corner of the second nail color up to the right hand corner. Repeat on the bottom right hand side, brushing upwards towards the top of left corner of the nail. After your nails have dried, apply your top coat, making sure the polish is dry enough where it won’t bleed into the other colors.
6. Goth Bomb Nails
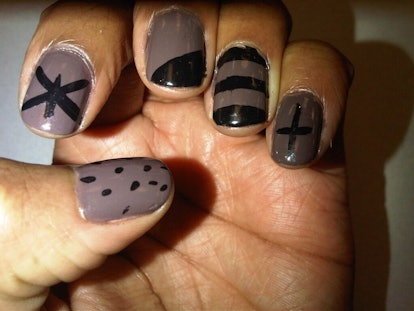
For those not so shaky hand days, which is almost never, I used free hand to make spiders and crosses on my nails. I’ll be honest, the first time I attempted this worked out almost perfectly, and all other attempts have ended in me having to paint my nails black.
I used a light color as my bottom and used a thin nail brush to quickly draw my shapes. The key to this goth madness is to only attempt shapes that you can master. Since, I can’t draw in real life, my shapes were limited by my lack of drawing skills and shaky hands, but that meant that my hands weren’t a sloppy mess.
7. Matte And Shine Nails
This is arguably the easiest of DIY nail art and can still trick the masses in believing you are a nail art genius. For my matte and shine look, I used black nail polish. Paint your nails black and add a fast drying top coat, before your top coat dries, use a matte finish top coat and brush from the left corner of your nail upward to the right corner. On my right hand, I use the matte finish top coat on the right corner of my nail upward to the left corner.
See? Who needs a manicure in a fancy salon, anyway? Not you.
Images: Kristin Collins Jackson
