Fashion
How To DIY A Glass Manicure For Summer Festivals

Getting bored of your plain old, traditional nail polish? Me too. That’s why I’ve been on the hunt for striking alternatives to don this season, like the DIY shattered glass manicure. As Vogue reported, the mani was created in Korea by Eunkyung Park and it’s the perfect way to give your nails a glitzy summer twist.
Mari Santos of TheDebrief.com has an awesome tutorial for shattered glass nails. Hers is a monochromatic silver look, but I decided to switch things up by using pink, holographic ribbon instead.
The main focus of the design is its glossy, iridescent finish. This was something that Park aimed to create after being inspired by the pearly insides of an abalone shell, according to Vogue. Embarking on a process of trial and error, she experimented with various different materials like candy wrappers before finally settling on nail stickers. “At first, I took that paper and spent a long time cutting it with scissors, arranging it individually on each nail, and painted a gel coat on top,” she told the magazine.
With summer festivals in full swing, and Coachella-inspo in the air, my thrifty DIY uses friendly home alternatives like ribbon and cellophane, as opposed to Park’s stickers. Not only does it make creating the design a lot more affordable, but it’s also incredibly easy to do. Don’t let the nail’s intricate appearance fool you: Once you're done, you’ll be left with a snazzy new manicure that matches all those outlandish outfits you're planning on wearing during festival season. Here’s how you can create your very own shattered glass manicure.
What You’ll Need
To create the manicure, you’ll need the following:
- False Nails (Optional)
- Nail Glue (Optional)
- Nail File
- Colored Nail Polish
- Top Coat
- Rainbow Craft Ribbon
- Scissors
- Cotton Swabs
1. Prepare The Ribbon
Start by preparing the ribbon or paper you’ll be using to create the shattered glass effect. I purchased this rainbow craft ribbon from a local craft store, but you can also use cellophane.
As you can see in the GIF, I then cut the ribbon at a diagonal angle. This creates shard-like shapes.
To emulate the original shattered glass design, you need to cut a mixture of smaller and bigger shards. This will help the design look more authentic and create the shimmery effect Park’s talons have.
2. Buff Your Nails
As my nails are incredibly small and short, I decided to apply false ones.
I buffed my nails with a nail file to get rid of any oil that would interfere and weaken the glue when I applied them.
Personally, I feel that the shattered glass design works best on longer nails, as it gives you a larger surface area to work with. But if you’re not a fan of falsies or are lucky enough to have naturally long talons, feel free to skip the next few steps.
3. Test Out Sizes
When it comes to applying false nails, I like to test out different sizes before applying them. For this design in particular, you want to use falsies that fit the shape of your original nail. This is important as it will give a smooth, clean finish and won't look too clunky or over the top.
4. File Your False Nails
Once you’ve tested out different nail sizes and applied them using nail glue, file them down to your chosen shape.
If you need a little help, Bustle has rounded up 10 different nail shapes that suit a variety of styles. Square? Rounded? Talons? What will it be?
Want more fashion and beauty tips? Check out the playlist below, and be sure to subscribe to Bustle's YouTube page for more hacks and tricks!
5. Apply A Colored Nail Polish
Now, it’s time for the fun part. Pick a colored nail polish and apply a base coat to your nails. After looking up a variety of shattered manicure designs, I decided to use white.
There are heaps of inspiration on Instagram, including gorgeous midnight blue and charcoal gray shades. Have a search and be as creative as you like.
6. Pick Up The Cut Ribbon
For me, the easiest way to pick up the cut ribbon was with a damp cotton swab. I ran it under the tap for a few seconds, before letting it stick to the shiny side of the shard.
7. Apply The Ribbon To Wet Polish
Next, simply push the cotton swab down onto your nail to apply the shard. Since the polish was still tacky when I placed the ribbon onto my nails, I didn’t need to worry about adding another coat.
If you’re using a quick dry polish, just apply a top coat before pressing the shards down. As long as the polish is still wet and there's something for the material to stick to, it will work.
After applying the first shape, continue with the pattern and apply the rest. I found that the design was more striking if I left a tiny space in-between the shards.
8. Add A Top Coat
Once you’re happy with the pattern you’ve created, trim any excess ribbon that might be hanging off your nails and add a top coat. This seals everything in place and gives your nails some extra shine.
What's It Look Like?
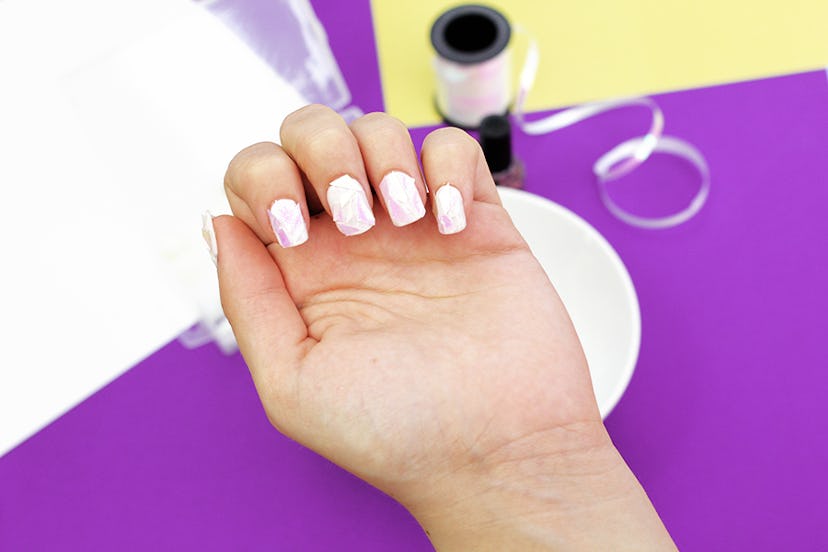
And here are the results. If your summer plans involve rocking out to your favorite bands, you can dress your nails up with a glittery, Coachella-esque ensemble. Or if you're simply having a mellow evening with a group of friends and an acoustic guitar, dress them down and let them be the standout accessory to your outfit.
Whatever you decide, you now have a festival-ready mani that channels the creativity of the season.
Images: Emma Matthews
