Life
How To Make A Bullet Journal

I'm the type of person that has to write everything down or I forget. Needless to say, I was intrigued when I heard about this thing called a bullet journal, which allows you to organizes all your ish in one place. Fascinating! So I began looking into how to make a bullet journal. I mean, as it stands, I keep an online to-do list, a handwritten to-do list, a calendar, and a journal for my purse — so sometimes when I write something down, I then forget where I wrote it down (facepalm). There's got the be a better way, right?
Enter the bullet journal. Admittedly the official Bullet Journal video is a little intimidating; it spends four minutes talking about dividing your tasks into days, weeks, and months, and then there are tons of numbers and letters, and then you have to draw symbols, and at one point, there's even a ruler involved. Not going to lie: The second the ruler came out, I was all, "HELL no. A ruler? Bye."
But I still managed to finished the video. Then I watched it again. My eyes glazed over. I searched the interwebs to see how other people are doing their bullet journals and how they break it down. Eventually, the lightbulb went off and I thought, "Oh. OK. Now it makes sense." So I went back and watched the original video a third time, and that was when I grabbed my own blank journal to get to work. (I still refuse to use a ruler, though.)
A bullet journal is actually a very useful, effective, and efficient method of staying on track. If you purchase a pre-made planner yourself, there's always something wrong with it — there's not enough space, there's too much space, there's space in the wrong places meant to be used for writing things you don't care about, and so on. The beauty of the bullet journal is that you can totally tailor it to your own liking.
My biggest problem with this was that it seemed like entirely too much work to set up, considering that it's supposed to make my life easier. I broke out in a sweat just watching the video and thought, "How about we just... don't?" But I discovered that keeping a bullet journal is kind of like eating chips: Once you start, you can't stop.
So, without further ado, here is a breakdown of how I've prepared my bullet journal. I used a Twilight themed journal. (Quit judging me.) And a word of advice: Unless you're one of those magicians who can write in straight lines, don't make the mistake of using unlined paper, like I did.
I followed the original video pretty closely but did make a few changes of my own. Here's how it went:
1. Create The Index Page

You know a journal is going to be intense when it needs its own index. This part is integral to your journal — it makes it easier to navigate. Open to the first blank pages of your book and write "Index" at the top of each. We'll come back to this later.
2. Set Up Your Future Log

Turn to the next set of blank pages and title both as "Future Log," the same way you did with the index. The video divides each page into three equal sections for the next six months; however, the point is simply to have designated space for each month, so how you divide it up isn't really crucial. I preferred to simply jot down the next six months and call it a day.
Before moving on, I needed to add these two pages to my fancy schmancy index. So, I numbered the pages (1 and 2), and noted that in my index.

3. Create Your Monthly Log
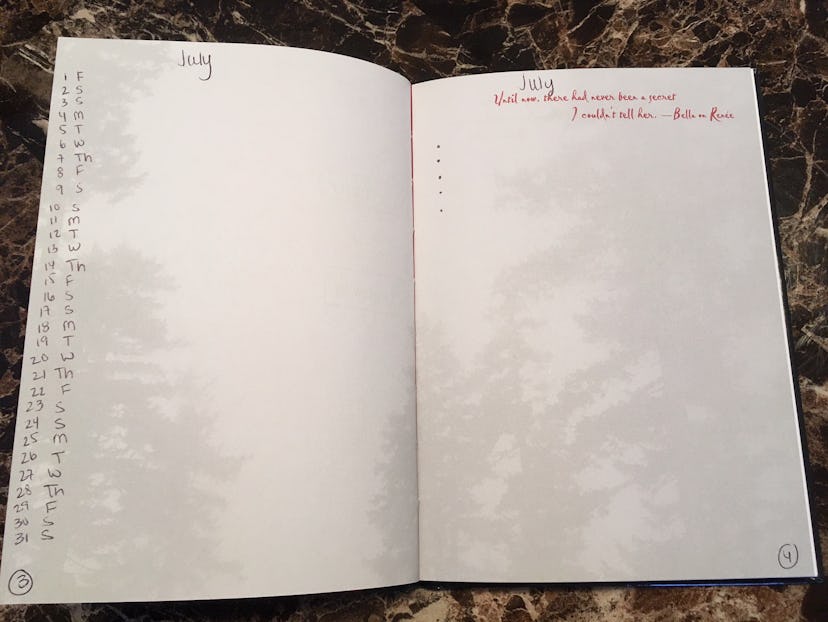
Turn to the next set of blank pages after your Future Log and begin by writing the month on each page. As I did in my Future Log, I started with next month (July). The left page will serve as the monthly calendar. Write down all the dates of the month — in my case, 1 through 31. Next to each (it doesn't matter which side), add the first letter of the day of the week it corresponds to. This year, July 1 is a Friday, so I started with F.
The right page serves as your monthly task list. This is where you should jot down all of the things you need to get done that month. I numbered the pages, but held off on putting it in my index quite yet.
4. Set Up Your Daily Log

Again, turn to the next set of blank pages and set up your Daily Log. For my personal Daily Log, I tracked three days per page and wrote each of them as [month] [date] [first letter of day of the week]. So I started with July 1 (F). This is just what made the most sense to my brain, but definitely go ahead and write it in the way that's easiest for you!
Under each day, write down all of the things you'll need to do. The video has them separated into tasks, events, and notes. Personally, I didn't want a separate symbol for notes, so as in the video, I used a dash for tasks and a circle for events. Ideally, these notes should be short and sweet, something the video refers to as "rapid logging."
July will take me to page 15, so I numbered them and added them to my index.
So, at the end of each month, you'll prepare for the following month in your bullet journal. Look at any remaining tasks that you missed from that previous month. If they're important, enter them for the following month. If not, cross them out! Bye bye! If you do need to complete the task but at a much later time, put it in the appropriate month in your Future Log.
5. Create Collections

I found this step to be kind of optional: You create collections to organize related tasks and notes — like grocery lists, classes, or long-term projects — but it was a bit overkill for me, so I skipped it. If you choose to create collections, don't forget to log it in your index!
Remember that it's A-OK to totally personalize your bullet journal so that it works for you, like this gal did in turning her journal into a beautiful work of art. If it helps organize your day, then you're doing it right. Happy journaling!
Images: FreshSplash/E+/Getty Images; Megan Grant/Bustle (5); Bullet Journal/YouTube
