Fashion
This Zombie Halloween Makeup Is Easy To Do
Of all the Halloween costumes, I'm convinced that the zombie is one of the classics. It never gets old, and there are so many different ways to achieve perfect, zombie Halloween makeup. But whether you prefer to keep it simple with pale skin and dark eyes, or make it a little more complex by adding oozing wounds, it's always nice to be able to complete a look with products you probably already have. So to get a wounded-zombie look with everyday makeup, here's what you'll need:
- Foundation two shades lighter than your skin tone, or a white cream base/eyeshadow pencil
- Eyeshadow in various shades of purple
- Black eyeshadow
- Black eyeliner
- Black or purple mascara
- Lash glue
- Purple lip gloss
- Red lip gloss
- Concealer
- Black lipstick
Besides this look being relatively simple to create, what I love about it is that it's so simple to dress up or down. Of course, you can always just wear your regular clothes with it for the classic civilian-turned-walking-dead look. But you could even pair other costumes with it like your favorite super hero's outfit or accessories like a tiara or rodent ears to be a zombie Wonder Woman, zombie princess, or even zombie Mickey Mouse. The options are pretty much endless. So you can be whatever kind of zombie you want this Halloween, here's how to easily get the makeup part down:
Step 1: Base
To give yourself a paler complexion, start by blending in a lighter foundation or white makeup all over your face. Don't forget to do your ears and drag it down your neck as well.
Step 2: Eyes
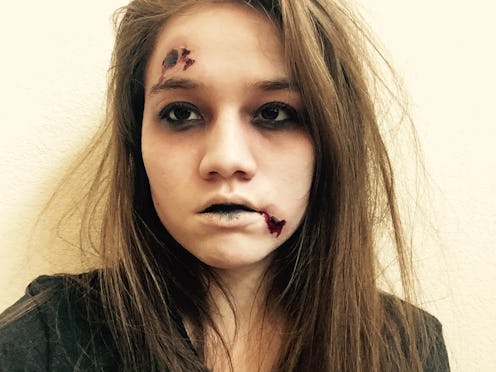
Have fun with the eyes because they can really be as messy as you like. To get that dead, sunken look, I applied a gradient of purple-toned eyeshadows. Starting with a cranberry color, I shaded in large circles all around my eyes. Then, I took an eggplant hue and colored in a slightly smaller circle. Finally, I used black eyeshadow to cover my upper and lower lids. Don't forget to drag the color onto the sides of your nose and where you might normally have under-eye circles to emphasize the hollowness.
Finish off the eyes by applying a black eyeliner to your waterline as well as your upper and lower lash lines. Again, keep it messy. Unfortunately, zombies aren't really known for having sharp and precise eyeliner. Top it off with a dark purple or black mascara.
Step 3: Contour
To further enhance a sunken face, contour under the cheekbones, around the nose, and along the temples and jawline with the same shades you used on your eyes.
Step 4: Wounds
OK, let's make some wounds. Instead of liquid latex, lash glue works almost as well. Choose a couple of spots on your face, and apply a layer of glue. After waiting for it to dry, pick open some holes, and pull the glue around as you like so there is some texture.
Next, it's time to shade. Go around the wounds with the same eyeshadow colors you already used to give a bruised look. Next, use a black eyeshadow to fill in any holes you created. This will add some depth to the wounds.
To make your wounds ooze, apply some lip gloss on the inside and underneath the "holes." (I used a cotton swab so as not to contaminate my lip gloss wands.) I started with a dark purple lip gloss, and then mixed in a red gloss to get the coloring I desired, but you can go pretty crazy with this part. Maybe zombies ooze blue or even green.
Step 5: Lips
Finally, I dabbed some concealer over my lips to cancel out any color that might signify life, and applied black lipstick to the inside, center of my lips. I like to think this gives the appearance of rotting from the inside out. For the finishing touches, hit your hair with some dry shampoo or texturizing spray to make it messy, and turn on your dead, hungry eyes.
Happy Halloween.
Images: Miki Hayes (10)
