
Oh, Bridget Jones. There's so much to say about Helen Fielding's literary creation turned rom-com super-spectacle. B. Jones is the [not so plus-size and only ever so slightly "overweight"] heroine we love to idolize. We claim that her existence has helped women with body image everywhere, and hell, maybe it has. To see a pretty normal babe struggling with getting dressed in the morning or finding love or nervously stepping on the scale makes the rest of us feel just a little less alone, right? Well, I don't know. I don't know if Renee Zellweger circa 2001 really made that much of a difference for the size acceptance movement (and honestly, I have my doubts). But what I do know is that Fielding's novel and Sharon Maguire's film are both pretty stupendous works of literary and cinematic genius. And amongst the reasons why is Bridget Jones's ugly Christmas sweater. Or, more accurately, Mark Darcy's ugly Christmas sweater.
Colin Firth's character would have been far more difficult to digest had it not been for his [almost] unapologetic use of the hideous Christmas jumper. He made ugly cool, over a decade before Hipsters popularized the trend. And we loved him for it! We just swooned over the adorkable-ness of it all, and cursed Bridget for not making a romantic decision then and there. OK, I'm being dramatic. But the point remains: This moment was iconic, and it's stayed in the hearts of rom-com enthusiasts everywhere.
And so, what does one do when plagued by procrastination and an upcoming holiday party? Well, this is the perfect opportunity to break out some DIY skills (and if you don't have any, fret not — this isn't that kind of project). I realize that Christmas is only two days away, but that's plenty of time to make yourself a unique and wonderfully grotesque sweater, using the lovely Darcy as your inspiration. With the help of my far artsier boyfriend, we managed to create one of the most beautiful (or ugly?) holiday sweaters in film history. And you can do it, too. In only six easy steps. You're welcome!
WHAT YOU'LL NEED:
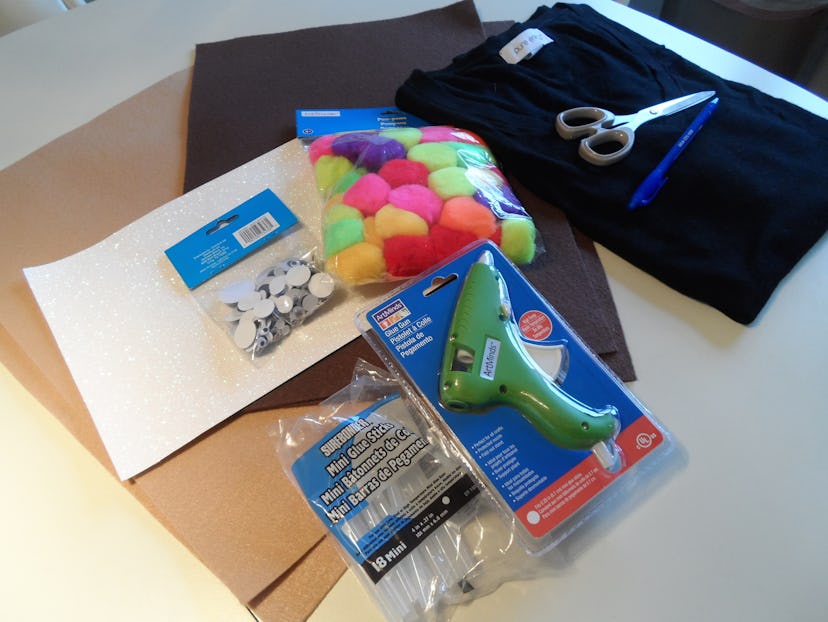
A last minute trip to Michaels supplied everything I would need, but any arts and crafts store should do just fine. And it turns out, most of them are open all week except Christmas Day.
- FELT: Two dark brown pieces. Two light brown pieces. One white piece. Go for the larger size!
- POM POMS: If only pom poms came in solitary packages. You'll need one large, red, nose-style fluff ball.
- GOOGLY EYES: Also sold in bulk, you'll want a pair of large, round eyes.
- GLUE GUN AND GLUE REFILLS: You might be able to get away with extra strength Elmer's, but a glue gun will only leave you about $5 more broke, and is more likely to work on thick fabric.
- FABRIC SCISSORS AND REGULAR SCISSORS
- PEN OR MARKER
- CARDBOARD: Not pictured, but very useful.
- SWEATER: Shoot for a turtle neck, but any sweater will do just fine. You can always layer it with a turtleneck underneath for added warmth.
STEP 1:

First thing's first: Plug in your glue gun so it has some time to heat. Your first official step, however, is to trace and cut out a large circle for your reindeer's snout, using the light brown felt. I used a plate to ensure perfect circularity!
STEP 2:

On the cardboard, draw out your reindeer's head, ears and antlers. You could do this straight on the felt if you so choose (and if you're feeling confident), but drawing on the cardboard allows for a much greater margin or error. Whilst Paddy was drawing our reindeer, he constantly referred back to the original Colin Firth photo (relying on your memory probably isn't wise). At this time, you can also draw out the white part of the reindeer's snout on your white felt. (Is it his mouth? We just don't know.) No cardboard needed for this bit, unless you value perfection.
STEP 3:

Use your regular, old scissors to cut out the cardboard image. Take extra care to all the detail in your deer's antlers! It's also worth remembering that its head, ears and antlers are all connected, so be careful not to cut out individual pieces.
STEP 4:


Now you can use your handy, dandy cardboard cut-out to trace onto the dark brown felt! After your image has been drawn, cut out your pieces.
STEP 5:

After the deer's antlers and head have been traced, you'll want to cut out the inserts from the original cardboard cutout (i.e. the deer's face and ears). You can now trace those onto a piece of light brown felt, and cut them out!
STEP 6:


It's glue time! This is hot glue we're talking about, so do be careful. You can either glue your deer together before touching the sweater, or glue it piece by piece directly onto the sweater (taking care to make sure you don't glue the front and back of it together by accident — which I might have done). I chose to first lay down the largest piece, which is the antler/ear/head combo. Next I set down the face, ears and snout. And finally, the unidentifiable white bit, the eyes and the nose. (You might want to add a little brown strip of felt to divide the deer's snout and head, but totally up to you!)
ENJOY?
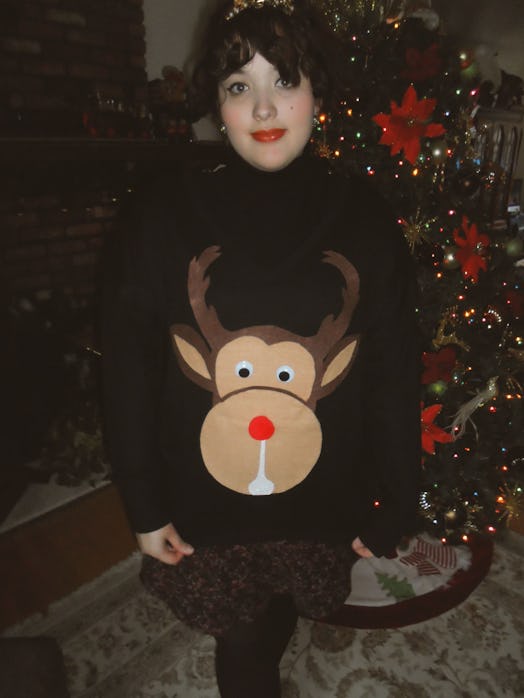

As you can see, I layered my sweater ($6 at Target) over a turtleneck for full Mark Darcy vibes. But if you want to preserve some semblance of style, I suggest you do without (though what would be the point in that). All in all, the project took about three hours (excluding travel time to and from the shops). I did, of course, have a second pair of hands assisting me all the way (and thank god for that — because I am really not the most artistic person out there), but it should be easy enough to accomplish solo if need be.
So there you have it. A last minute DIY project for all you fellow procrastinators out there. If you agree that Colin Firth's Bridget Jones sweater is the ugly Christmas sweater, this might be just the thing to wear your upcoming holiday affair (and I don't mean a dramatic and intense juggling of Mark Darcy and Daniel Cleaver).
Images: Giphy; Author
