Fitness
How To Do Oblique-Burning Side Plank Dips
Upgrade your ab workouts.
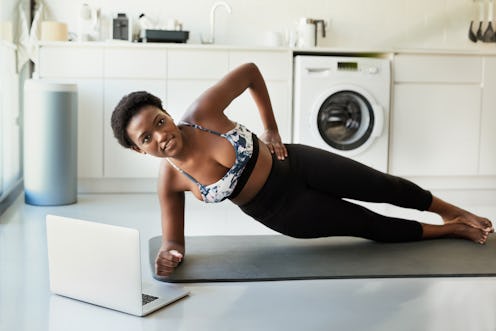
Once you’ve mastered forearm planks and side planks — two staple variations of the ab exercise — it might be time to take things up a notch with side plank dips. This combo core move challenges your body in different ways than your typical side plank and is worth a go if you’re down for even more of a burn.
While there are countless challenging core workouts to choose from, Melissa Bentivoglio, a Pilates expert and co-founder of the Pilates company Frame Fitness, says side plank dips offer a great way to strengthen multiple muscle groups at once.
The move involves holding yourself up in a plank and simultaneously dipping your hips down. While you’re doing the exercise, you end up working the transverse abdominal muscles — also known as the obliques — as well as the inner thighs, shoulders, lats, and glutes. “In addition, side plank dips improve your balance, and they’re a fantastic postural exercise that lengthens your muscles,” Bentivoglio says. So you’re elongating your body, likely after your muscles have been shortened from either sitting or moving through high-impact workouts, which helps improve your overall mobility. Plus, working on your balance is a key element of functional training that translates to healthier movement beyond your fitness routine.
That said, side plank dips aren’t for everyone. According to Nick Olsen, a certified personal trainer and owner of x365 Fitness, you might want to avoid them if you have shoulder or hip issues since the move places a lot of strain on these areas. With that in mind, here’s how to do side plank dips in proper form to spice up your ab workouts.
How To Do Side Planks Dips
Bryan Blackwell, a personal trainer and partner of gym Kaeos Fitness, shares tips for mastering the side plank exercise:
- Begin the exercise by lying on your side.
- Prop up onto your forearm. Place your top arm on your hip.
- Stack your feet, or place your top foot slightly in front of your bottom foot if you need more stability.
- Make sure your elbow remains in alignment with your shoulder.
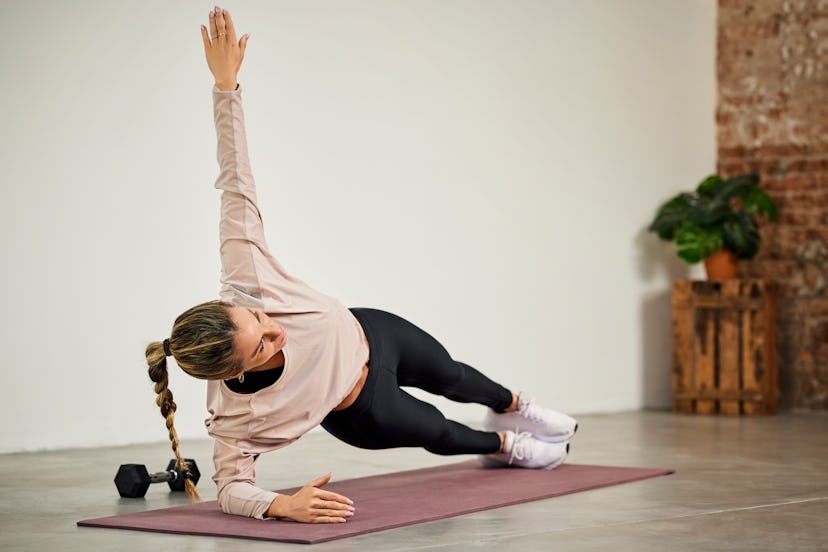
- Take a breath and lift your body off the floor to get into a side plank. You’ll be supporting your weight with just your upper body and your feet.
- Once you’re in a side plank, lower your hips to the floor, then immediately raise them back up in a controlled manner. This equals one rep.
- Do five to 10 dips per side to complete one set.
For beginners, Blackwell recommends doing three sets per side. If you’re more advanced, go for four to five sets on each side. You can also gauge your workout in terms of time instead of reps. Bentivoglio recommends repeating the move for 30 seconds at first and eventually working up to 45 seconds per side, and then progressing to one minute over the course of a couple of weeks.
Side Plank Dip Modifications
Don’t feel like you’re “bad” at side plank dips if you need to use a modification. In a standard side plank, your feet will be stacked one on top of the other. To get more support, place one foot slightly in front of the other. You could also drop down onto your knees to do a modified side plank, says Bentivoglio. Another tip is to start with your weaker side first, Blackwell says, since it gets harder to maintain proper balance the more fatigued you get.
If you want to make the move more challenging, keep both of your legs straight and lift your top arm to the sky. The added need for balance will force your muscles to work even harder.
Form Mistakes To Avoid
The most important thing about planks is maintaining proper alignment. “If your shoulder starts to rise up toward your ear, it won’t give you the support you need to hold the position,” Gia Calhoun, a fitness expert, Pilates teacher, and vice president at Pilates Anytime, tells Bustle. So check in as you do them to make sure you aren’t lifting or sagging any parts of your body.
If you catch yourself crunching up your neck or shoulders, Calhoun says to lower your shoulder back down to release that tension. While you’re at it, check to make sure your bottom arm is stacked right under your shoulder.
Finally, try not to rest your hip on the floor at the bottom of the dip, adds Calhoun. Instead, keep your obliques tight so that your core remains lifted, even if it means doing fewer reps. This will ensure your ab muscles are engaged, so you get the most out of your workout.
Studies referenced:
Kett, A. (2021). Sitting for Too Long, Moving Too Little: Regular Muscle Contractions Can Reduce Muscle Stiffness During Prolonged Periods of Chair-Sitting. Frontiers in Sports Act. Living. https://www.frontiersin.org/articles/10.3389/fspor.2021.760533/full
Experts:
Melissa Bentivoglio, Pilates expert and co-founder of the Pilates company Frame Fitness
Nick Olsen, certified personal trainer and owner of x365 Fitness
Bryan Blackwell, personal trainer and partner of the gym Kaeos Fitness
Gia Calhoun, fitness expert, Pilates teacher, and vice president at Pilates Anytime
This article was originally published on
