Fashion
How I Cured My Cystic Acne At Home
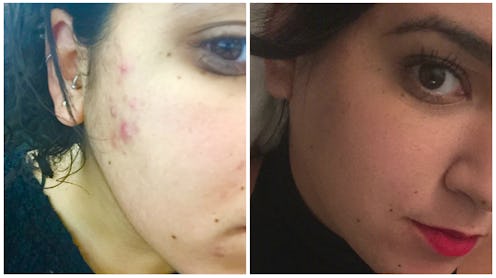
It’s been 18 months since my first major cystic acne breakout. I woke up one morning and on my right cheek lay a pimple the size of a small Hawaiian volcano on the verge of eruption. “One pimple does not a break out make,” I told myself as I looked in the mirror paralyzed with insecurity about my new companion, but confident it would disappear within a few days. It didn’t. In fact, with every passing day, the zit grew bigger, redder and more painful, giving birth to other zits that eventually formed an entire acne colony.
I was 25 years old, and up until that point, I had yet to feel victimized by the tormenting experience they call “breaking out” in my pubescent or post-pubescent years. “I don’t get pimples... and I never even wash my face!” I’d brag to friends and even perfect strangers in a somewhat exaggerate tone, not realizing I was jinxing myself into a future full of unmanageable acne.
It sounds dramatic, but I felt lost and alone with my new acne, surrounded by my generally glowing girlfriends who were less girls and more women, and who had long since outgrown their petite pimple problems. I’d never spent a single penny on expensive face washes, toners, or moisturizers, let alone bank-breaking trips to the dermatologist. As a freelance writer, I’m not exactly Forbes Under 30, and none of those things ever seemed important enough to spend the money on (especially not up against some of my wiser and more pressing financial priorities... *cough*pizza*cough*wine.*) But with every forced public outing, I was starting to feel more and more like the guy from the “people say I eat too many chocolate bars” commercial.
I knew it would take a few months to save the money for a consultation, so I settled for temporary fixes like excessive concealer and thick wooly scarves, which of course only agitated the skin further. But then something — or should I say someone — wonderful and unexpected happened. A week before the big money moment, I met Syeda Zehra: eyebrow lady by day, skin saving superhero by... well... also day. Zehra is a certified aesthetician at Caryl Baker Visage Cosmetics at the Toronto Eaton Centre downtown who was taking on the high pressure task of waxing my million dollar Middle Eastern eyebrows when she noticed the band of bright red aliens setting up base camp on my right cheek and literally screamed. “I know, I know… I have an appointment with a dermatologist next week.” She let out a gasp even louder than the one before.
“Corinne can I please help you with this?" She asked, promising that, with the right products and about three months of dedication, she could calm my skin down.
I was so tempted not to believe her, but the next words out of her mouth were, "If you’re not better in three months, I will pay for your dermatologist visit myself.”
And so we began. Since everyone's skin journey is bound to be different, I still recommend visiting your own Zehra or dermatologist if you're struggling with painful breakouts. But this is what worked (almost like... magic?) for me.
Step 1: Extraction.
Be afraid, be very afraid. Most of these steps are at-home remedies, but this is one that should left to the pros, especially when/if using an extractor tool.

Tweezerman Stainless Steel Extractor Tool, $12, Amazon
Zehra loves extraction because Zehra is a sadist. While I've had extraction done with the double-sided devil’s tool in the past, Zehra prefers the much gentler route of soft extraction with her fingers.Whatever your method of choice, and make the decision carefully, extraction definitely does the trick when it comes to cleaning out blemishes from the inside out.
The angled loop removes whiteheads and the flat loop presses out blackheads. Your professional should use a hot towel to open pores before extracting. He or she will then slide the loop along the blemish, and clean with cotton and alcohol when finished. Expect some persistent redness and sensitivity for a few minutes to hours following the extraction, especially with cystic acne where the congestion is more deep-rooted than us mere mortals understand.
Step 2: Fruit Enzyme Scrubs.
AKA rainbows and sunshine and dead skin everywhere.

Pineapple Papaya Facial Scrub, $28, khiels.com
Exfoliants are nothing new when it comes to getting rid of excess dead skin cells, but fruit enzymes like papaya, pineapple, or orange peel are an important piece of the anti-inflammatory puzzle that will not only reduce blemishes by penetrating congested areas with healthy antibodies, but act to prevent them while brightening and smoothing your skin.
Unlike harsher methods like gel scrubs and microdermabrasion, which, according to Zehra should be limited to weekly or monthly use, enzyme exfoliants are gentler and can be used daily, or every other day for more sensitive skin. After cleansing with normal face wash (I go with a papaya mousse cleanser from Caryl Baker to keep things consistent) gently massage a quarter size of your product onto moist skin in a circular motion until all excess dirt is removed. Remove with a warm, damp cloth and follow with toner and moisturizer.
Step 3: Alcohol-Free Toner
N-a-t-u-r-a-l, natural.

Revitalizing Ginseng Toner, $33.50, Rreneerouleau.com
Do me a favour? If you’re blemish prone or are suffering from cystic acne and the toner in your beauty cabinet has a trace of ethyl alcohol in it, throw it out immediately before your skin gets as dry as the Sahara Desert, and replace it with a toner formulated with ingredients like Ginseng, Green Tea Extract and Antioxidant Vitamin C for a fresh, radiant glow that moisturizes rather than dries.
Step 4: Peels.
Start fresh.

EmerginC Triple Threat Peel, $102, carylbakervisage.com
It may seem pricey, but one bottle of this miracle peel will last you up to two years (use about 2-3 pumps once a week) and will leave you feeling glowier and glowier after every use. Not only are peels great for congestion-prone skin, but they also work wonders for evening out pigment and removing stubborn dead skin.
Once a week, after toning, apply a thin layer with a facial brush (included) and leave on for two to three minutes. Tingling is normal. Increase time with every use to a maximum of seven minutes. Remove with cold water (this will neutralize the effects of the peel, even if you haven’t removed all of it) and follow with serum and moisturizer.
Step 5: Spot Treatment.
All hail the zit cream!

Mario Badescu Skin Care Drying Lotion, $17, Amazon
Truuuuuus me daddy, spot treatment will save your life, and tinted spot treatment will save your life and make it safe for you to go out in public with it on (think concealer, but good for you!) If you’re looking for a quick fix, look no further than this salicylic acid-based drying formula that beauty Goddess Kylie Jenner herself swears by (and so do I).
Before bed (after washing, toning and moisturizing), dip a Q tip straight to the bottom of the bottle (don’t shake) and apply a small amount of the pink sediment onto the blemish. Don’t rub it in, let it dry and rinse it off in the morning. And great news for all you budget-conscious beauty lovers, this tiny bottle will last you 4eva eva!
Step 6: Oil-free, oxygen-based moisturizers.
Breathe in, breathe out.

Philosophy ‘Take a Deep Breath’ Oil-Free Oxygenating Gel Cream, $40, Amazon
Just like deep breathing is the best medicine for stress, extra oxygen is the best medicine for stressed out skin. Most moisturizers are heavily oil-based which is great for dry skin, but for people experiencing large build ups, adding too much oil to the mix is the last thing you want to do, as your skin will overcompensate by drying up those areas.
Step 7: Monthly Facials.
Say goodbye to scars.

Cystic acne scars are no joke. Even after I rid my skin of any active congestion, I still suffered from the dark spots and marks left behind. Regular microdermabrasion and oxygen facials are designed with skin resurfacing in mind, and overtime I have gained back most of my natural pigment in the affected area and my skin has become noticeably more elastic and youthful.
The three-phase facial exfoliates, targets problem areas and refines the skin while propelling natural mineral crystals into it. In other words, it gives you that Kim K glow without the 10,000 pounds of foundation. Get. It. Girl.
How long did all of this take, you ask? I started seeing dramatic changes in my skin as early as two weeks into treatment, but just as Zehra promised, in exactly three months my skin was as good as new and neither she nor I had to pay for a visit to the dermatologist.
