It seems all too often that dry skin doesn't need an actual reason to appear. It certainly isn't limited to dry, winter months: This past summer alone has brought me more eczema and dry skin clients than any other time of year. That's precisely why making a basic cream for dry skin with turmeric, my almighty healing agent, had to become a priority.
I am slightly in love with/awe of turmeric. The main reason it's a key ingredient in this low-grade eczema cream is due to the many vitamins and nutrients found in this vibrant herb. Turmeric contains vitamin A which is known to repair tissue. It also contains vitamin E, a popular cosmetic antioxidant that reduces inflammation. The vitamin C in turmeric helps fight and protect against damage and as one fellow Bustler pointed out, these vitamins are important in preventing dry skin. Additionally, turmeric has Omega-3 fatty acids, another thing that dry skin sufferers may be lacking in their diets. I've always been a fan of planting the same nutrients that are good for my skin topically as well as internally. What can I say? I'm a fan of synergy.
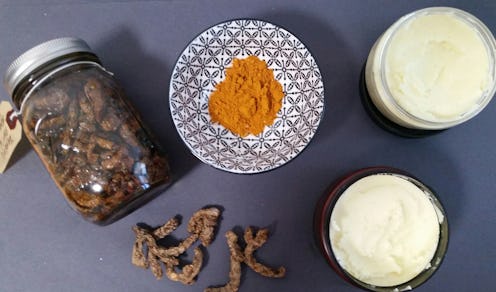
Don't let the orange coloring of turmeric steer you away from using it on your skin. Depending on the form and purity of the turmeric, a tiny touch of turmeric can go a very long way. Plus, there are plenty of additional dry-skin fighting ingredients in this particular cream that will help dilute that orange shade.
For this recipe, you'll need the following:
- 8 oz of butter e.g cocoa, shea, mango etc
- 2 oz of beeswax (optional)
- 6 oz of oil
- 1 tbsp of turmeric oil
Now, let's get started.
1. Working With Butter

For my recipe, I chose a combination of mango, cocoa, and kokum butter. Softer butters are softer like mango and shea can be added directly in a large mixing bowl. For harder butters like cocoa, melt down in a saucepan on low heat and let cool before mixing with the rest of your ingredients.
2. Choosing & Adding Oil

Choosing an oil depends on how much you like the aroma or weight of the oil just as much as the specific remedy. I chose to work with coconut oil and avocado oil: According to natural living blog Mind Body Green, coconut oil is a fatty acid with anti-inflammatory properties and the high fat content gives it a longer shelf-life for my end product. Avocado oil is rich in vitamins A, D, and E and has been known to reduce irritation from eczema. Once you've chosen your fixed oil(s), add to your large mixing bowl with the butter.
3. Adding Turmeric

This recipe specifically calls for turmeric oil. You can infuse your own olive oil with dried turmeric, but that process takes several months. If you're in more of a hurry than that, you can purchase pre-made turmeric oil that will work just as well. Using organic turmeric powder is totally an option, but processed turmeric loses curcumin, a powerful antioxidant found in turmeric that reduces swelling. Moreover you may find the color too vibrant even after your application is blended if you use powder.
4. Preparing For Blending

Pour all the contents of the mixing bowl into a blender and give it a few stirs. At this point, you can add filtered water to the blender as well; I added about six tablespoons to mine. Check your settings on the blender and make sure it's plugged in before proceeding to the next step.
5. Dealing With The Hardness Of Beeswax

If you purchase raw beeswax it will be rock hard, so use a double boiler to melt down the beeswax completely before you try to blend it. The beeswax emulsifies the oil, butter, and water in a cream, but this step isn't just about texture and consistency; beeswax is another great ingredient when treating severely dry skin and mild eczema. Beeswax has a chain of fatty acids and it's antibacterial and moisturizing. Many have found beeswax to work for eczema and prefer it to the standard petroleum based OTC treatments. Once the beeswax has melted completely, quickly pour it directly in your prepared blender and start blending. Beeswax hardens quickly, so make sure you are ready to blend when the wax melts.
6. Blending Everything

Once the beeswax has melted completely, quickly pour it directly in your prepared blender and start blending. Beeswax hardens quickly, so make sure you are ready to blend when the wax melts. Turn the blender on and keep your eyes and ears open. Harsh sounds can help you identify if you need to manually mix things up before continuing to blend (this may happen if you don't melt your butters) and you should watch for the thickness. Often, I add a little water as needed.
7. Storing Your Cream

There are many claims that you can over-blend a cream, but in my education and experience I've never found this to be true. If your final product seems completely liquefied when you take it out of the blender, don't worry. Pour it in a sealable container and let it sit at room temperature to harden. Storing in the fridge can solidify your application, but often the joined ingredients become slightly grainy. This cream can be used multiple times a day, on wet or dry skin, and stored at room temperature for three to four weeks.
Use this recipe as a guide for your dry skin needs; once you play around with the oil-water-wax ratio, you'll know what works best aesthetically and for your body. Apply on affected areas or all over with clean hands. Add a essential oils and natural preservatives like citric acid, but if used uneducated, they can lead to irritation. Check the expiration dates on your ingredients to establish the truest shelf-life. But most of all, enjoy.
Image: Kristin Collins Jackson (8)
