Fashion
How To Wear Blush When You Have Blotchy Skin
I have rosacea, and it's the reason why I avoided wearing blush for years. Rosacea can be really annoying. It makes your skin look slightly or severely flushed; everyone is different, but for me my cheeks are almost always somewhat ruddy. It gets worse if I indulge in a trigger, such as coffee, alcohol, or exercise — but it pretty much never goes away.
The only thing that gets rid of my rosacea, at least temporarily, is makeup. For years I would simply cover up my redness with foundation. Although it worked, it wasn't the best look because foundation on its own can make your face look really one-dimensional and washed-out. Many women swear by blush to help themselves look more awake, healthier, and even friendlier. Although I loved how it looked on others, I always thought that I couldn't wear blush because I'm so naturally ruddy. That's not the case, however.
In the past year or two I decided to figure out how to make blush work for me, and after some trial and error I finally found a technique that looks great. It takes a few steps, so I'll always be envious of women who can skip the base makeup and just put on blush and be done with it, but the end result is worth it. Whether you have rosacea, skin that flushes easily, or you just want to try a new way to apply blush, read on to find out how to successfully layer blush over foundation for a natural, subtle effect.
What you'll need:

- Foundation
- Concealer
- One or two highly pigmented blushes (in a shade that doesn't match your skin's natural flushed color)
- A fluffy brush
- Liquid highlighter (optional)
I'll mention all the products I used that are pictured above as we go through each step. Here's how I apply my blush so that it doesn't look like my rosacea is taking over:
Step 1: Moisturize.

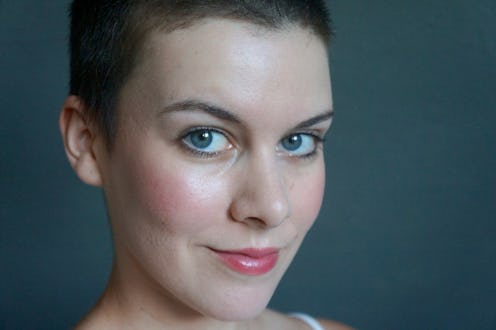
I'm not wearing any makeup in the photo above so you can see how naturally flushed my skin is.
Before embarking on any makeup look, it's important to first prep the skin. My skin is very dry so I never put makeup on without moisturizing first. In the summer I like to use a gel moisturizer that gets absorbed quickly and helps with redness, such as First Aid Beauty Anti-Redness Serum, ($36, Amazon). I skipped primer but if you have oily skin you may want to do that as well.
First Aid Beauty Anti-Redness Serum, $36, Amazon
Step 2: Lay your foundation.

The next step is to conceal my skin's natural ruddiness with foundation. I like to use Japonesque Colour Luminous Foundation, ($36, Amazon) in shade 02. It's great for dry skin because it gives a slightly dewy glow and doesn't cling to any dry patches. Don't worry about concealer just yet; that comes later. Also worth noting in the picture above is how washed-out and flat my face looks with just foundation. By the end of this, you'll see what a big difference blush makes.
Japonesque Colour Luminous Foundation, $36, Amazon
Step 3: Apply a bold blush.

This is going to be a lot of look, but that's OK because it's only temporary. Pick a highly pigmented blush in a color that doesn't match your skin's natural flush, such as a red that leans orange (like MAC Powder Blush in News Flash, $16 or NYX HD Blush in Crimson, $7) or perhaps a peachy coral (such as the one in the Tarte Energy Noir Clay Palette, $38). I find that the bolder the color the better, because then I can sweep it on very gently and still get plenty of color payoff without disturbing my foundation. In the past I would try to blend pale pink blush for five minutes only to find that my skin was getting much pinker than I wanted thanks to my foundation being worn off and my skin getting irritated.
MAC Powder Blush In News Flash, $16, Nordstrom; NYX HD Blush In Crimson, $7, Target; Tarte Energy Noir Clay Palette, $38, Macy's
I like to use a very fluffy brush for this; a brush with very densely-packed bristles will deposit too much color. I use It Cosmetics Heavenly Luxe Complexion Perfection #7 Brush, $34, Amazon; it's so soft. I sweep the blush from the apples of my cheeks (not too close to the center of my face) along my cheekbones to my temples. Keeping the color placement high on my cheeks helps a lot because my natural rosacea extends much lower.
It Cosmetics Heavenly Luxe Complexion Perfection #7 Brush, $34, Amazon
Step 4: Tone it down with concealer.

This next step is key, since you don't want to walk around with a bright stripe of blush on your cheeks (it's not the '80s anymore, after all). Once you have a decent color payoff gently layered on top of your foundation, you can tone it down a little with the help of concealer. I like to dot on NARS Radiant Creamy Concealer ($29, Sephora) in the shade Vanilla along with Becca Shimmering Skin Perfector ($38, Sephora) in Pearl and then blend them together on top of the blush, either with a concealer brush or by patting gently with a clean finger.
NARS Radiant Creamy Concealer, $29, Sephora; Becca Cosmetics Shimmering Skin Perfector, $38, Sephora
This concealer is great for dry skin (it really is creamy and gives a radiant finish) and the Becca highlighter helps impart a dewy glow while toning down some of the blush. Start at the top and blend your way down until the middle part of the blush is toned down and the edges are blended to match the rest of your skin tone.
Step 5: Add a little more blush if needed.

And that's about it! Usually after toning down the initial blush application with concealer, I'll go back and add a little more blush — either a very light application of the same color or a different, lighter shade. Just be careful to dust it on very lightly so as not to disturb your foundation and concealer. This way I end up with just the perfect amount of blush: not too much and not too little, but just enough to give a pretty, healthy flush that looks nothing like my natural rosacea. It may seem like a lot of extra steps but it doesn't take more than a few minutes to do and makes a big difference.
Images: Kelly Dougher
