Fashion
7 Steps To Perfect Brows

I remember the first time I ever filled in my eyebrows. I looked in the mirror and thought I looked crazy. I felt like filled-in eyebrows completely changed my face. Well they did; I just wasn't ready for their power. What I didn't understand is that groomed arches are not selfish features. It's not just the brows that are changed when they are penciled in. Because eyebrows are the feature that frame the face, they have the power to draw attention to your other features, especially your eyes. But in order for your brows to reach their maximum potential, it is important to work realistically with what you've got. Although we all may have differently shaped eyebrows, there are three general guidelines that work for any shape for when you're first learning how to fill in your eyebrows.
- The innermost edge of your brows should line up with outer-bridge of your nose. This will give them good separation without being too far apart.
- If you look straight into a mirror, draw an imaginary line straight up from your pupil. This should be where your brow begins to taper into its arch.
- Following the angle of your lower lash-line, draw an imaginary straight line towards your temple. The tail of your brow should meet this line. This will ensure that your brow has the right length to best frame your eyes.
When filling in your brows, to get the most natural look, remember you're enhancing your natural shape, not changing it. Also, as I'm sure you've heard, eyebrows are sisters, not twins. Don't worry if they don't look exactly the same. Just give them the opportunity to be the best they can be, and they will work wonders on your face. Here's how to get your best brows:
1. Comb
Start by combing your brows up and over with a spoolie so you can see the true shape of your brows. This also helps open up even spaces for the product to stick to your skin.
2. Tail
Start penciling in the tail. You'll want to use a bit of a heavier hand here, since the tail should be darker than the front of your brows. You can also extend the tail if you want your brows to appear longer.
3. Define
Lightly define the bottom of the front end of your brows. This will give them a crisper look.
4. Fill
Then, lightly fill in the front end. For the most natural look, fill in in the direction your hairs naturally go, and draw using light strokes. If you find the color is coming off too dark, comb back through with a spoolie. This will erase some of the product, making it lighter.
5. Arch
Using roughly the same pressure as you used on the front of your brows, define and fill in the arch on the top side of your brow.
6. Gel
After you're happy with how your brows are filled in, apply a brow gel combing your brows up and over in the same manner as step one. This will lock your brows in place.
7. Highlight
Highlight just under your brows to show off their definition and make them pop. Eat your heart out, Cara Delevingne.
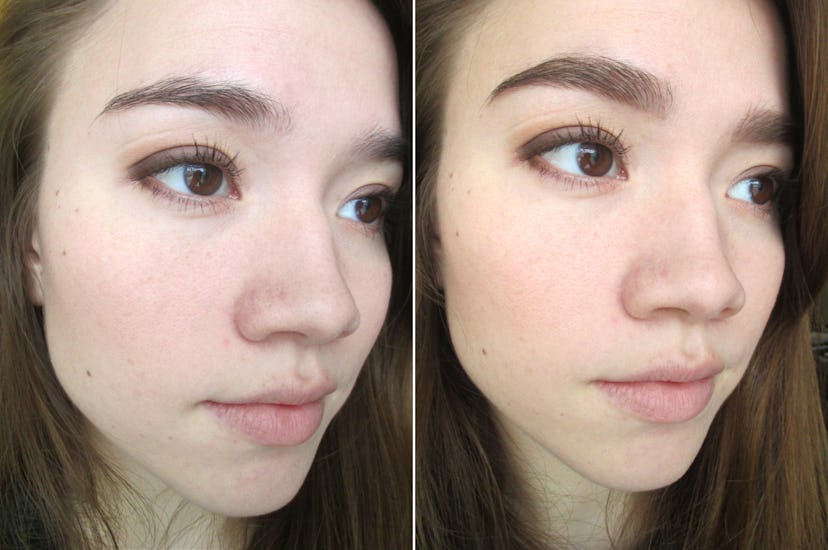
Before & After
Images: Miki Hayes (8)
