Fashion
How To Apply Makeup With Your Fingers

I have a confession to make – I wear cosmetics nearly every single day and have mastered the art of applying makeup with fingers. I haven’t used a single brush in a month. You might be reading this and thinking, "Come again?" And I know it sounds kinda crazy.
As a beauty junkie, I used to swear by makeup brushes. I must have a collection of over 50 for every and any makeup concern. Eventually, I found it super hard to keep track of all of my brushes and to constantly switch them out during my routine for the next tool. Life got hectic and I became so tired of lugging around a set of brushes when I had to do my makeup in the car or at a friend’s house, so I wound up doing away with the whole thing altogether.
There are two major things to keep in mind when doing this. The first is that your hands must be cleaned and sanitized because you will be in constant contact with your face — which can be a recipe for breakouts. The other is that cream products work best with this method, so if you’re a powder girl, it might be best to consider switching over to cream and liquid products if you're interested in this technique as they are super blendable.
1. Face Primer

Primers have so many great benefits to making your makeup look its absolute best — from helping products go on smoothly, to filling in lines and pores. Apply a pea sized amount on the back of your hand and dip your ring finger into the primer. Dot the primer on the areas of your face only where you need it. There’s a huge misconception that you need to wear primer all over your face, but most people only need it on the cheeks, chin, and nose. Blend the primer with your ring finger in gentle patting motions.
2. Eyeshadow Primer

Similar to face primer, eyeshadow primer can make your eye makeup last for hours and prevent it from creasing. Apply a pea sized amount on the back of your hand and pat the product gently onto your eyelid with your ring finger until it becomes translucent and no longer visible.
3. Foundation
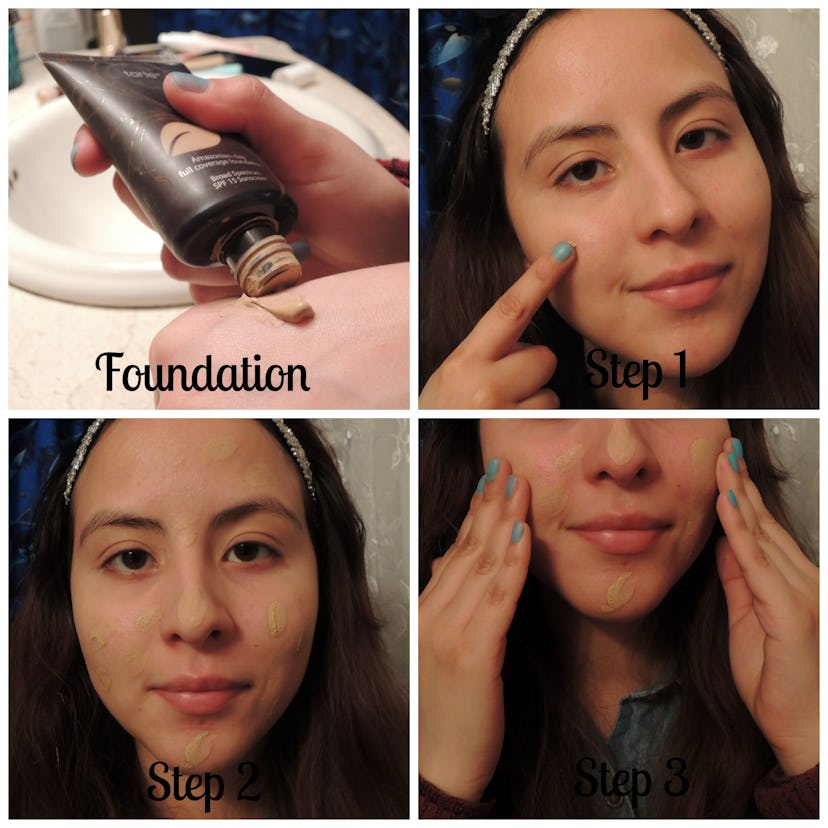
To even out your skintone and tone down and redness, apply foundation onto primed skin. Apply a dime sized amount of foundation to the back of your hand and begin dotting it on your face with your pointer finger. Start inward working your way out from your nose to your temples. Blend the foundation with your ring finger, concentrating on the undereye area. For larger areas of the face, massage the foundation in with all of your fingertips.
4. Concealer

Concealers are amazing for covering up any problem blemishes or brightening up the eyes when you want to look awake. For the undereye area, choose liquid products that have a brush, wand or sponge tip. This way, you can draw on your concealer in the shape of an inverted triangle starting from your nose to your cheeks. Once you’ve drawn the shape, start blending the concealer outward with your ring finger from your temples and into the side of your nose. For blemishes, cream concealers work best. Just pass your finger over the pot of concealer and use your middle finger for added pressure to tap on the product over the area.
5. Blush
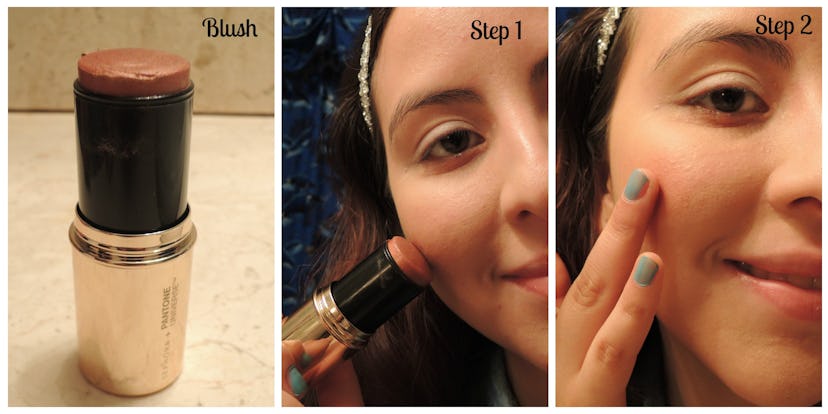
If you’re in a rush and need a quick hint of color, cream blushes are the way to go. Most come in twist-up sticks, so twist up the product and pat your finger over the blush. Start patting the product on with your ring finger at the middle of your cheeks and blend it outward toward the temples. Be careful not to pat it on too close to your nose because it can make the blush look unnatural.
6. Lipstick

Believe it or not, lipstick is probably one of the easiest things you can put on with your fingers — especially if it’s a liquid formula. Apply lip balm as a hydrating base using your ring finger all over the lip. If you want your lipstick to look even more sheer and natural, instead of applying it straight from the tube, brush the applicator along the inside of your ring finger. Start from the center of the lip and begin applying the color first on the bottom lip, then the top.
7. Eyeshadow

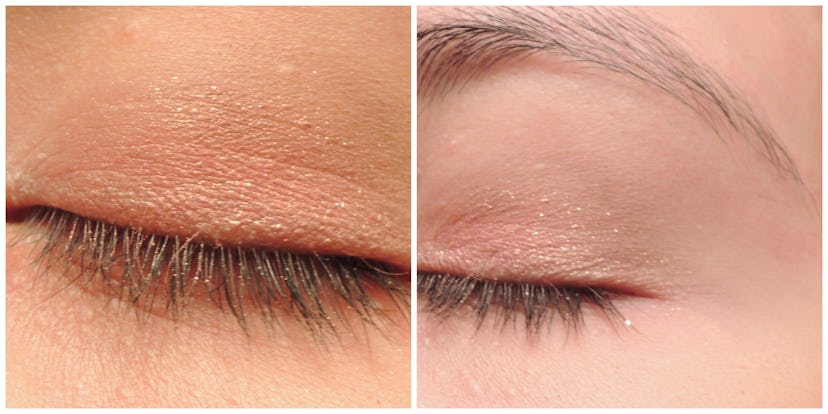
If you’re in a pinch and find yourself without an eyeshadow brush, using your fingers can provide the fastest solution. Start with a color two shades darker to define your crease and use your pinky finger to sweep the color onto the area. Pat any additional colors of your choosing with your ring finger (or pointer finger for a more dramatic look) on the rest of the eyelid, working your way from the center outward. If you want to highlight the inner corner of your eye, use your pinky and apply a shimmery shade around your tear duct to look bright-eyed.
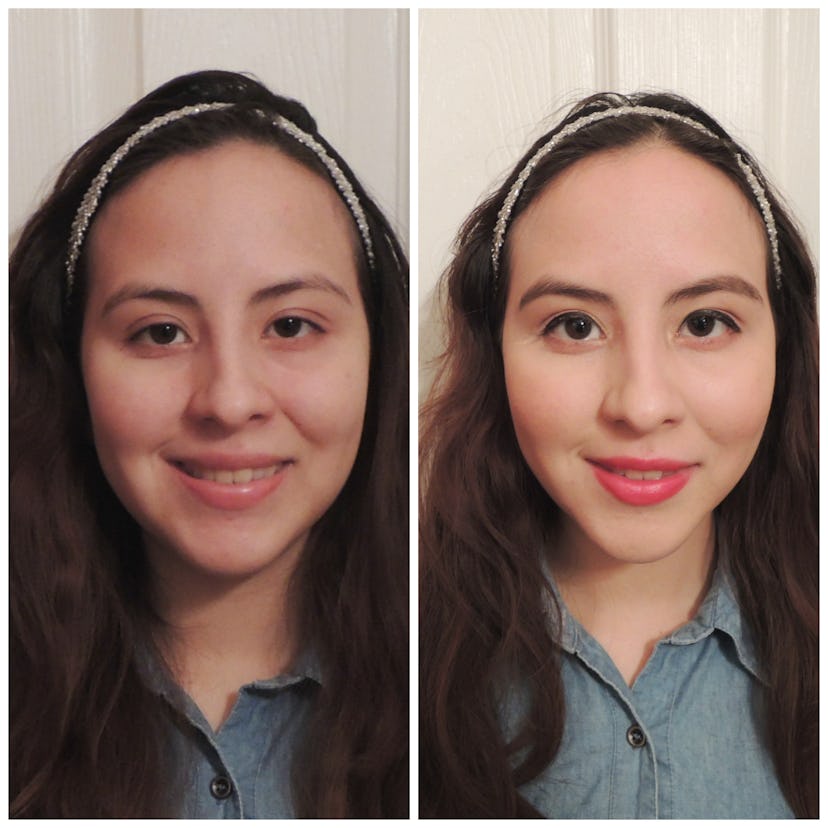
I must say, not too shabby for a quick look completed sans brushes.
Images: Author's Own
