Style
I Wore A Different Color Of The Rainbow On My Eyes Every Day For A Week
The sun is shining, Pride Month 2017 is unfolding beautifully, and summer is upon us. In other words, now is the perfect time to bring rainbow makeup to your look, each and every day.
I get it: Neutral eyes are easy and can be more versatile. But colors. Colors are a feast for the eyes that can truly take your glam to the next level. Would you rather live as Dorothy in boring, old black-and-white dusty Kansas or run rampant in the beautiful, technicolor land of Oz? Colors may be intimidating, but as long as you're following the proper guidelines, it's as easy as clicking your heels together three times.
I'm all about a rainbow look, and I wanted to inspire by wearing a different color of the rainbow each and every day of the week. To pull this off, I used my Urban Decay Full Spectrum Palettes and Make Up For Ever Artist Shadows.
Urban Decay's Original Primer Potion, $22, Sephora
As with most of my full color looks, I like to begin my using a really strong primer that will not only keep my masterpiece on throughout the day, but will also help to saturate the color on my lid even more. Personally, I love Urban Decay's Original Primer Potion because it has a slight nude tint that brightens up my eye, allowing the shadows to show more than the naturally-occurring darkness on my lid. If you have a medium to deep skin tone and you truly want the colors to pop, using a neutralizing primer, like Laura Mercier's Eye Basics or Urban Decay's Eden Primer Potion can really help to amplify your chosen tones. Just make sure to avoid primers that appear gray on the lid, as they will dull down your chosen shadows.
Laura Mercier's Eye Basics, $28, Sephora | Urban Decay's Eden Primer Potion, $22, Sephora
I also applied a sheer layer of a nude shadow with a fluffy brush, like Sephora Collection's Pro Tapered Crease Brush, from lashline to browbone. This sheer layer of powder prevents the bright colors we're about to apply from sticking to the primer too much. This step is vital for easy the blending of brighter tones.
Sephora Collection's Pro Tapered Crease Brush, $20, Sephora
Now you're ready for a technicolor dreamscape all over your lids.
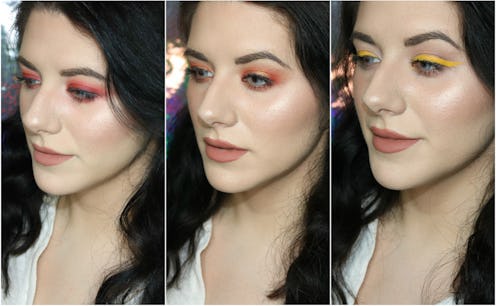
Red

Because red has been trending lately, it may be the best way to ease yourself into wearing a vibrant hue out into the real world.
After prepping and priming my lid, I used a flat eyeshadow brush to pat on the shade Seize from the Urban Decay Full Spectrum Palette from lashline to crease. Flat brushes will give shadow saturation, which is extremely important when sporting brighter tones. Gaps and patchiness are more visible in candy-colored looks.
Patting motions (as opposed to swiping motions) layer on the color evenly and thoroughly. Using a fluffy, tapered brush and little circular motions starting at the outer corner and working inward, I gently buffed out any harsh lines and edges. Blending is key when using brighter tones because mistakes become more visible.
If you're having a hard time blending, you can also choose a neutral transition color one shade darker than your skin tone and blend that into your crease as well. This will tone down the saturation of the red shadow, quickly cheating the perfect gradient.
To give my look depth, I repeated my patting technique with a deeper red tone, Red Ochre from the Anastasia Beverly Hills Modern Renaissance Palette, starting at my lashline and quickly fading out halfway into my lid space.
When smoking out the bottom lashline, it's best to use a dense smudgy brush, like Sephora Collection's #11 Smudger. Keep the same color you utilized for the lid closest to the lashline, and buff out the bottom of the smudged line with whatever color you used for the crease. This will soften the look a bit.
Don't forget to apply some black liner and mascara so your lashes don't get lost in the shuffle.
Here's the final look:

Orange

For my orange eye look, I decided to create a smoky halo effect, meaning that both the inner and outer corners are more saturated while the center of the lid stays nice and bright.
After I prepped and primed my lid, I began by packing and patting on a light orange shadow, like Jones from the Urban Decay Full Spectrum palette, with a small, flat brush, like Sephora Collection's #18, into the inner and outer corners. This lighter orange tone will act as the sketching before the painting.
Sephora Collection's #18, $18, Sephora
After applying the lighter orange to both your inner and outer corners, make sure to buff out any harsh lines and edges with a fluffy blending brush, just like we did in the previous look.
I then repeated this process using a deeper, more neon orange, specifially Slowburn from the Urban Decay Electric Palette which is on sale for $24 and you need to purchase before it's discontinued for good. I just bought myself a new backup in anticipation.
Friendly reminder: what goes up must come down.
To create even more contrast, I applied a gold cream shadow to the center of my lid using my finger. I used Pat McGrath's Metalmorphosis 005, but you can also use NARS Paint Pot in Iskandar or Estee Edit's new Fluid Metal EyeShadow in Sparked.
Add a little liner and mascara for definition.
Here's the final look:

Yellow

Yellow shadows can be very difficult to use. True bright yellow shades contain little to no white pigment, which means they apply kind of sheer and uneven to the eyelid. To avoid a hot mess of semi-saturated big bird realness, why not try a dramatic yellow wing instead?
Start by giving your eye a little depth by applying a lighter shadow all over the lid and a neutral one or two shades deeper than your skin tone into the crease. If you naturally have prominent bone structure, you can skip this step. But my hooded eyes need a bit of a lift, so this step makes or breaks the look.
Using a pointed liner brush, like Sephora Collection's Pro Bent Liner, and Make Up For Ever's Yellow Cream from the Flash Palette, I created a dramatic winged liner shape. If you're not ready to invest in the magestical flash palette yet, you can also use Inglot AMC Eyeliner Gel #84.
To be extra safe, I set the yellow cream with a yellow shadow, Urban Decay's Calavera, once again from the Full Spectrum Palette. Using a small flat brush, just pat the shadow onto the cream or gel liner to ensure it doesn't transfer.
Here's the final look:

Green

For my green look, I played with the halo smoky technique again, deepening both my inner and outer corners.
Just as I did in my orange smoky look, I started with a lighter green before emphasizing the depth with a deeper green. The first shade was Urban Decay's Mean.
The second was Urban Decay's Hatter. Both shades are from the Full Spectrum Palette. I really do turn to Urban Decay when it comes to bright, pigmented colors.
To intensify the contrast, I applied a fluorescent lime green, the shade Thrash from the Electric palette, using a flat brush and patting motions to the center of my lid.
Don't forget to smoke out the bottom lashline before adding liner and mascara.
Here's the final look:

Blue

To keep my blue looking modern, I created a soft, angular smoky shape that's very of-the-moment. I built the base for my look with NARS Eye Paint Solomon Islands. I utilized a flat synthetic brush to pat on the cream from lashline to lid, and blended out any harsh lines with a synthetic fluffy brush. Pro tip: Synthetic brushes are better to move creams. Natural brushes won't really shift them at all. I also brought the cream onto my lower lashline, starting at the outer corner and working inward.
I set the cream with a fluffy brush and the shade Blindsided from the Full Spectrum Palette. I have super oily eyelids so setting the cream is an absolute must.
To add depth to the look, I used a flat brush to apply a shimmery denim-colored shadow, like Slanted from the Urban Decay Naked Smokey Palette, to my inner corner and center of my lid. Shimmers reflect light and give the illusion of coming forward, which gives depth to my flat hooded eye shape.
Utilize a little liner and mascara and you're good to go.
Here's the final look:

Indigo

You don't have to put color all over your entire lid to make an eye look really pop. If you have less space on your lid and brow bone, this technique might illuminate the proper placement for you.
To start, I gave some lift to my lid by applying a lighter shadow to my lid and a deeper shadow to my crease. I keep the colors in the warmer family, utilizing shades like Nudie, Faith, and Extra Bitter from the Urban Decay Ultimate Naked Basics. These orange-based neutrals will make the blue-based Indigo pop even more. To open my eye even further, I also patted some Vermeer from the Anastasia Beverly Hills Modern Renaissance Palette onto my lid.
My goal was to create an Indigo-based gradient on my lower lashline. I started by applying a healthy amount of Urban Decay's 24/7 Waterline Pencil in Push onto my bottom waterline. To create a gradient, I used a smudgy brush to apply Chaos from the Electric Palette right into my lower lashline. I created a gradient by applying Gonzo from the same palette right below Chaos, and Metamorphosis from the Full Spectrum right below that.
The result was a heavy, rockstar-worthy dose of indigo smoke.
For extra drama, I utilized black liquid liner to create a small cat eye before applying mascara.
Here's the final look:

Violet

Violet is such a gorgeous color to end your ROYGBIV experiment with, TBH. To begin, I created a base for my shadow using Make Up For Ever's Aqua XL Pencil in M-92.
To intensify my eye, I applied the sapphire shade from Guerlain's Ecrin Shalimar from lashline to crease. I started by using a flat brush and patting motions, but quickly learned that a sponge applicator worked best to quickly build up saturation. Once again, I used a fluffy brush and circular motions along the crease to buff out any harsh lines and edges.
To add depth, I blended Urban from the Electric Palette into my outer corner using a fluffy brush.
Guess what we're going to do now? Add liner and mascara of course! I'm pretty sure you got it at this point!
Here's the final look:

As they say, after every storm, there's a rainbow. It's not as hard as it looks to add some bold color to your day-to-day eye look, so why not give one or seven of these colors a shot?
