Fashion
Does "Baking" Really Make Your Makeup Last Longer?
Does your makeup seem to just melt off of your face by the end of the day? Same here! So when I heard of the classic drag makeup technique baking that's started to get a lot of traction in mainstream media, I had to try it out for myself. To "bake" your face, you have to apply a large amount of loose powder over your cream concealer to any area that you wish to set and highlight. The result is supposedly a long-last glow, and a more intense contouring effect. Dozens of makeup artists and celebrities (aka the Kardashians) swear by this method to achieve that beautiful under-eye glow. Personally, I'm a huge skeptic when it comes to new makeup trends, so I wanted to put baking to the test to see if it would really set my makeup for hours on end.
The method of baking promises to reduce any creasing or fading in your makeup to the areas that the powder is applied. For someone with dry, acne-prone skin, this seemed like a dream come true. My only hesitation was the amount of powder that you needed to use to pull it off. Seriously, you need a lot of powder for this. However, I had high hopes. If I could have a flawless complexion after this, I wouldn't mind spending a little extra on powder each month. Wondering if this method actually made my makeup last? Check out my experiment below for more details!
1. Starting Off — 11 a.m.

Here is my "before" image. This is what my face looks like after I apply a thin coat of my usual foundation. Next, I began the journey to baking my face.
Here's a quick overview of how it's done.
First, you apply a bit of eye cream to your under-eye area. Next, you apply a thin layer of a full-coverage concealer. I used my Kat Von D Lock-It concealer for this part. After that, you need to apply a thin layer of a highlighting concealer. My choice was the Maybelline Fit Me concealer. I added the highlighting concealer to under-eyes, bridge of my nose, forehead, jawline, and chin. Now, comes the fun part.
Kat Von D Lock-It Concealer, $25, Sephora; Maybelline Fit Me Concealer, $6, Amazon
2. Baking

To bake your face, dip a damp sponge into your loose powder, and apply to the areas that you have highlighted. I choose to use the e.l.f. Studio High Definition Powder for this. As you can see, you need to apply a generous amount. Now, you wait. Let the powder sit on your face for ten minutes to achieve the full effect. This is where the term "baking" comes from. When the time is up, flick off the powder with a brush, and marvel at your highlighted face.
e.l.f. Studio High Definition Powder, $6, Amazon
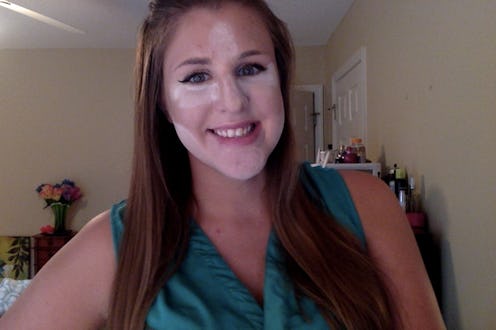
3. Check In — 12 p.m.

I forgot to snap a photo of my "after" look. However, I managed to get this selfie of myself on my way to a family event. I was very impressed by the lack of creasing I had under my eyes. Even though I'm only 22, I have a few fine lines that like to eat up my concealer. Also, I need to note how matte baking makes you look. With the amount of powder I used, it makes sense, but still I was shocked. This method leaves zero room for any shine or dewiness.
4. Check In #2 — 3 p.m.

Three hours later, and my makeup is still looking fresh. By this point, I would normally notice some fading around my chin, however, the baking seemed to keep everything in place.
5. Check In #3 — 6 p.m.

As you can tell, I'm a fan of car selfies. By six o'clock, I had noticed some fading along my chin and forehead. Nothing too crazy, but enough for me to notice. However, my under-eye area was still looking amazing.
6. Check In #4 — 9 .m.

This is right before I washed my makeup off. At this point, the zits on my forehead and chin were definitely showing. In retrospect, I think I should have added a bit more powder to these areas in order to have kept them looking fresh for longer. However, my under-eye was still looking great. There was zero creasing throughout the day. It was amazing!
Final Results
Would I use this method again? Maybe for big events. As for adding it into my daily routine, I don't think I will. It looks amazing, but I don't really have time to bake each morning. Also, the amount of powder is a little crazy. I could see myself having to buy new powder every other month if I did this regularly.
Overall, I think this method is great for using under your eyes. I noticed zero creasing or fading throughout the day. It was awesome! However, I did noticed that when I baked my chin and forehead the method was less effective. So while I would probably do this again, next time, I think I would add a little more powder — and take a few less car selfies throughout the day. Maybe.
Images: Emily McClure (7)
