Fashion
Anyone Can Create This DIY Makeup Organizer
Have you ever felt incredibly jealous of your Pinterest princess friends who hand-make anything and everything they could ever possibly need (and have really cool Instagram snaps because of it)? Well, have no fear: This super easy DIY makeup organizer is one that literally anyone can achieve. It's especially rad for those of us who don't have $100 to spare on supplies and soldering tools. In fact, all you need for this tutorial is the boxes your lippies came in, some scissors, and enough tape to wrap around them all.
To help walk you through it isn't just a witty article by yours truly, but a video by YouTube sensation and my absolute favorite makeup vlogger Patrick Starrr. This makeup organizer is only for your lipsticks and glosses, but IMO they're the main types of products you probably want on display anyway. They're definitely the main things Starrr and I like to have on display.
By using the boxes that your lipsticks, glosses, and other lip products came in, you can make a customized makeup organizer that only you will own. Considering how cute makeup packaging can be these days, it only makes sense to utilize what you already have instead of blowing loads of money at a craft store on supplies that you don't even know how to use properly.

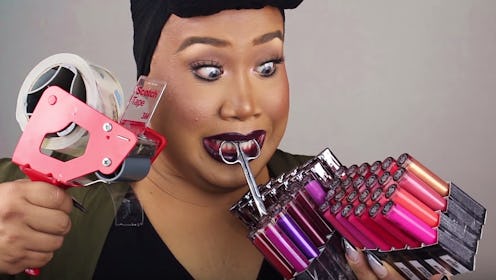
Here, Starrr shows us the supplies we need to create our makeup organizer, all the while showing off his to-die-for manicure. It's a manicure that inspires hope, TBH, because if someone can make this organizer with a full set of pointed acrylics, it must be simple.
To reiterate, you will need scissors, tape, the original packaging your lipsticks came in, and maybe a ruler, if you want to be a perfectionist.
Although Starrr is using lippies from the same collection, you don't need to have a full set from one brand to pull this off. All the boxes will be cut to the same length and taped together, so don't worry about having differently-sized boxes.

Next up, you will take your products out of their boxes (if they still reside there) and flatten the boxes. At this time, you need to work out where you want to cut the boxes.
Because all of Starrr's products are by Anastasia Beverly Hills, he's decided to do this after the final "A," but if your boxes are from different brands, you may want to measure out a specific distance. That said, you can just go by eye, which is the easier and quicker way to get this organizer made.
You then simply discard the top half of the boxes, tidy up the bottoms of the boxes, and slip your lippies inside. Just repeat the process until all of your boxes are completed.


Next — and you may have guessed this already — you tape the boxes together.
You can choose to do this by color, by brand, or even by personal preference. It's your homemade makeup organizer, so you get to decide how to present your lippies inside it.
Once your boxes are organized into rows, you tape the rows together to complete your brand new makeup organizer.


And ta da! You now have your very own homemade makeup organizer. None of your DIY-loving friends can mock you again, and I'm sure your mom will tell you how proud of you she is if you send her pics of your new creation.
If your packaging features the names of your products on the bottom, lifting up your new makeup organizer will also reveal which lippie goes where.

Just look at how cool these are! If you're not into product packaging, I'm sure this little organizer could be decorated with wrapping paper for a unique additional touch.

And if you're more of an auditory or visual learner than a reader, Starrr's video will talk you through this process in more detail.
You see? Anyone can do this.
Images: Patrick Starrr/YouTube
