Life
Here's A Hack To Use If You Hate The Order Of Your Top 9 On Instagram
For data nerds, the this time of year means one thing: end of year social media stats. Over the past few years, some of the top platforms have begun a new trend of showing users the highlights of their year. Three notable examples of this are Facebook, Spotify, and Instagram. While you may not mind showing off your polished Facebook posts or killer music taste, Instagram is different. If you're not an actual influencer, chances are at least one post you weren't so fond of made it into your most-liked. Luckily, figuring out how to how to change the order of your Best 9 on Instagram is pretty simple.
If you go look at your Facebook account right now, your memories tab includes an additional selection of things to look back on. The video created by platform runs for about a minute, and walks the viewer through a virtual scrapbook of the year 2018. Spotify also does a version of this by taking information from users' accounts and compiling a list of their most streamed artists, genres, and songs. It even creates a playlist with the latter.
Instagram's version is the Top 9, which assembles your most liked photos into one square, perfect for posting. But, if your favorite pic didn't earn a top spot, did you know you can change the order and customize it? Here's how to make the most of your Instagram Top 9:
1. Open Canva

To create a customized Top 9, your best bet is to use the graphic design program, Canva. It's free and extremely user-friendly (take it from someone who created her resume using the program). Even if you've never used the program before, you'll pick it up in no time.
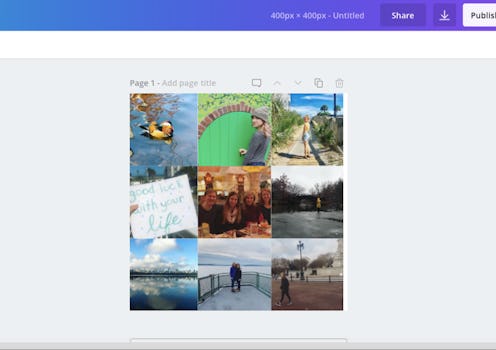
2. Set Dimensions For A New Design

To make sure your creation is the proper size for Insta, click on the "Custom dimensions" tab at the top right corner of the page before you select which project you'd like to design. You wouldn't want any photo to get cut off. Your best bet is to make sure the dimensions are equal to get a square; for our purposes, we used 400 x 400.
3. Click "Grids" On The Lefthand Side

Next, under the "elements" tab on the left side of the screen, select grids. Then, scroll down to about half way to the bottom of the page to find the 3 x 3 grid.
4. Take Screenshots Of Your Instas & Upload Them

There are two ways you can approach capturing your favorite Instagram posts of 2018 to arrange them on this template. First, you can screenshot them on your phone — then you can either AirDrop them or email them to yourself. But, you can also capture them from a Desktop by visiting Instagram and screenshotting them. On a Mac, you can capture specific parts of a screen by holding down Command + Shift + 4. The upload button for Canva is also on the lefthand side of the screen.
5. Download Your Grid & Upload It To Instagram

Finally, once all your photos are uploaded, you can choose to arrange them in any order you please. Who cares about likes? Everyone knows if you were lucky enough to snap a photo of the hot duck it deserves to be at the top.
The point of Instagram is to curate the photos you take however you see fit, so why leave something as important as the Top 9 up to chance? With few extra steps, your year in review will be the envy of all your followers.
