Style
Here's How To DIY A Makeup Pad Dispenser
Recently, I’ve been trying to organize my makeup drawer. It doesn’t take much for it to become messy, and I’ve been on the hunt for some cost-effective ways to declutter it. Thankfully, Instagram is always on hand to help, especially, with this homemade makeup pad dispenser.
I found the tutorial for the dispenser on Paula Stephania’s account and was impressed at how useful it was. Makeup pads and cotton balls are always taking up room in my drawer — or spilling all over the place, thanks to ripped or broken packaging. In the video, Paula shows viewers how an old Pringles tube can easily be transformed into a gorgeous creation that’s both handy and looks lovely placed on top of a dresser.
It looked so great that I decided to give it a go myself. After all, it seems like the ideal way to clear out the clutter from my drawer. It's also incredibly easy to make and features a lot of things that I already have lying around my house. Finally (and perhaps most importantly), it also saves a buck or two. After looking on Amazon, for example, a plastic version of the dispenser costs $30. Yikes.
So, if you want to follow suit and get organized, save some money and learn how to create a DIY makeup pad dispenser, here's what you need to do.
What You’ll Need
To make a DIY makeup pad dispenser, you'll need the following:
- Pringles Tube
- Knife
- Makeup Pads
- Sharpie
- Spray Paint
- Stickers
1. Remove The Packaging
Start, by removing the packaging from the Pringles tube. You won’t be needing the paper seal, but keep the lid handy.
2. Clean It Out
Next, clean it out. You can use a damp or dry cloth for this. Just make sure you clean out any crumbs that may be left in it.
3. Fold The Makeup Pad In Half
Now, you need to fold one of the makeup pads you plan on storing in the dispenser in half.
4. Place It Against The Tube
Place the makeup pad against the bottom of the dispenser and draw around it with a Sharpie or permanent marker.
5. Continue Drawing
Once you've drawn around the makeup pad, the tube should begin to look something like this.
6. Cut It Out

Next, cut around the lines you've just drawn. You can either use a craft knife or pair of nail scissors. The aim is to create a semi-circle, like in the photo above. This will be the bottom of the dispenser.
7. Spray Paint It
Now, it's time to decorate the dispenser. Spray paint the tube in a color of your choice.
8. Add Stickers
Then add additional decorations. I used stickers on mine, but you can be as creative as you like. Get crafty with paint and stencils or draw on patterns with metallic markers.
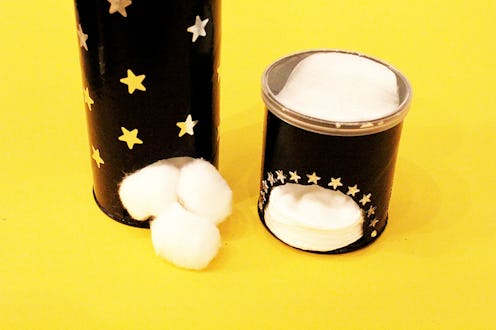
9. Fill The Dispenser
Fill the dispenser up with either cotton balls or makeup pads. I decided to create two in this tutorial. I used a larger Pringles tube for cotton balls and a smaller one for makeup pads.
10. Add The Lid
Once you've filled the dispenser, place the lid back on it.
11. Place And Use
And it's as easy as that. You now have a useful yet nifty makeup pad dispenser. I'm incredibly happy at the outcome of this DIY and definitely plan on keeping these two on top of my dresser.
Rummaging around in the back of drawers for packs of cotton balls and makeup pads is now a thing of the past. I've also cleared heaps of room out in my drawers and made them look a lot tidier. All the more reason to splurge on new makeup, am I right?
Images: Emma Matthews
